1998 BUICK PARK AVENUE ULTRA CRUISE CONTROL REPLACEMENT
I have just completed replacing the factory cruise control module with a Rostra Universal Electronic Cruise Control 250-1223 I bought from amazon.com. This page will explain how I mounted the module in the factory position, hooked up the throttle cable and tied in the wiring to the factory harness so the factory control switches can be used.
Background.
The symptom that was happening when the factory cruise control was first acting up has been described on several forums:
- The cruise would be engaged and for no apparent reason it would just disengage. The cruise would be able to re-engage if the throttle was pressed while pressing the resume/accel button.
- The cruise would disengage when the vehicle started on a downhill slope causing the throttle to release. When this happens the cruise can be kept engaged by hold slight pressure on the accelerator pedal.
- The cruise would try to resume a previous set speed until the speed was reached and reduction of the throttle causes the cruise control to disengage.
- The cruise control would accelerate as long as the button is held until the button is released, then the cruise control would disengage.
- The cruise would hold on level road and accelerate up inclines, but on a downslope it would then disengage.
Signals.
The factory cruise control module in addition to the power, cruise set/coast, resume/accel, on/off, Vehicle Speed Signal, brake applied and disengage input, there is a cruise inhibit input that receives a signal from the Powertrain Control Module to inhibit the cruise operation. The inhibit signal was the problem I had with my system. I deduced this from actually replacing the two brake switches under the dash – yes there are two! I also replaced the cruise control module with a nos unit which worked for a short while. I went to the Internet and found a good explanation of the cruise control system operation on the 3800pro forum, see: cruise-control-not-working #post208652. In that post you will find the description of the inhibit signal which is as follows:
- A cruise control system DTC has been set.
- The vehicle speed is less than 40.2 km/h (25 mph).
- The vehicle speed is too high.
- The vehicle is in PARK, REVERSE, NEUTRAL, or 1st gear.
- The engine RPM is too low.
- The engine RPM is too high.
- The system voltage is not between 9 volts and 16 volts.
- The antilock brake system/traction control system is active for more than 2 seconds.
Since not all shops have a scanner that will detect all of the monitored possibilities and correct them in the Powertrain Control Module, the only sure way to get the inhibit signal removed may be to go to a dealer and run the risk of paying for a diagnostic which does not find a reason for the cruise control system DTC being set. I decided to replace the module with an after market unit that would not use the inhibit signal. The only downside of this installation is the loss of the cruise being disengaged should the engine rpm increase due to the shift lever being moved to neutral. I didn't consider this as a big problem for me as I have had several vehicles in the past that had cruise control systems which did not have this protection and never had a problem. If you are worried about this possibility, you could tie in the tachometer signal, but I found it to be too difficult to be worth the effort.
Preparation.
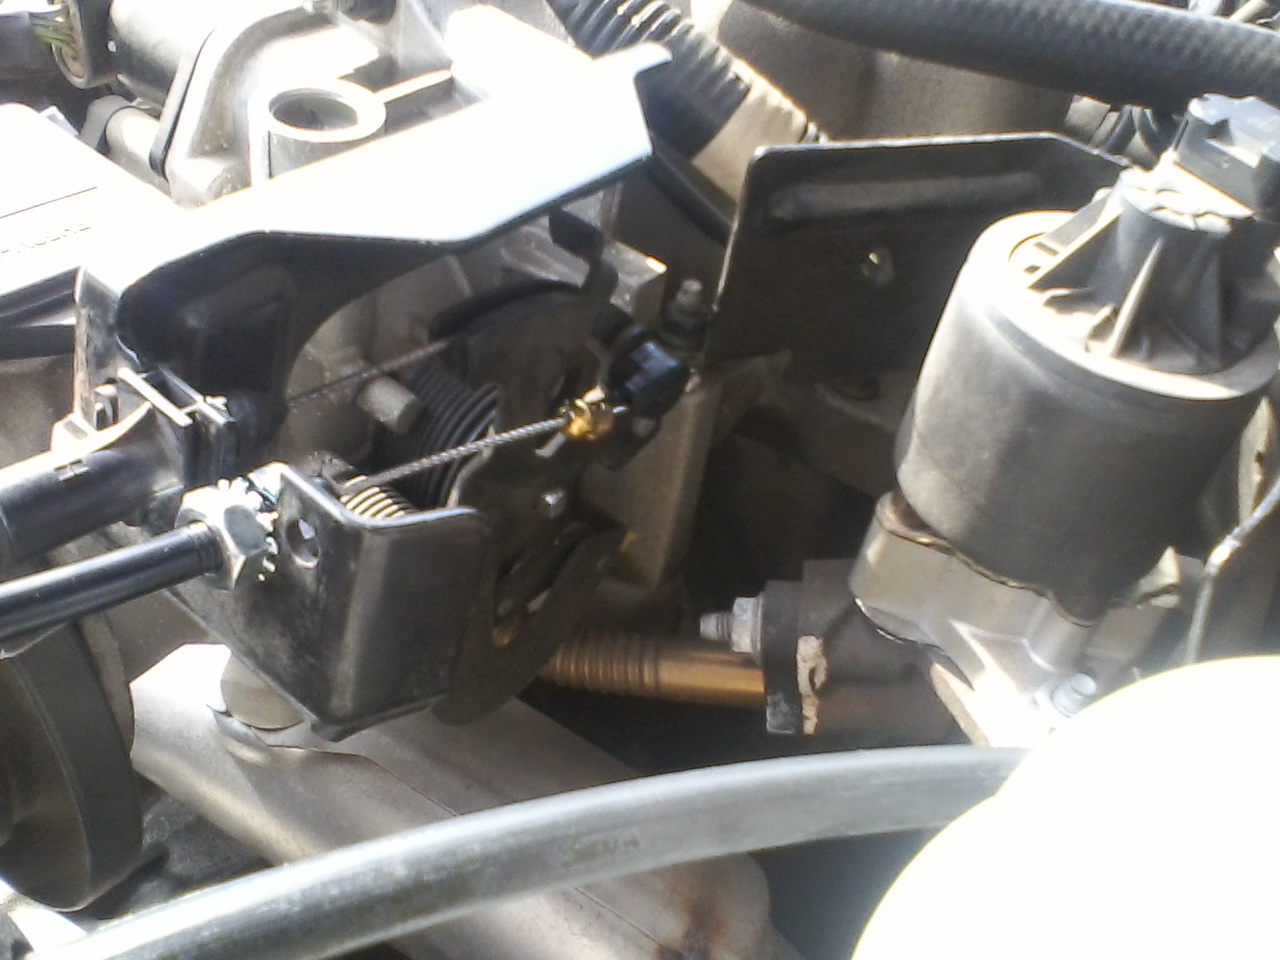
The first thing required for the installation is the removal of the factory cruise control servo module. It is located in the center of the firewall and mounted to a bracket which is secured to the firewall with a couple of 10mm nuts. You will need to remove the cover over the engine by removing the oil filler tube (quarter turn and pulls out) and a plastic nut in the center of the cover. This will allow access to the throttle control. Remove the cruise control cable attached to the throttle by pressing it off of the tab. Remove the cable on the mount by pulling it upward out of the slot in the mounting bracket. Disconnect the electrical cable from the cruise control module and remove the module. The cable is pressed into a couple of clips and when freed can be snaked out for removal. Remove the factory module from the bracket with three 10mm bolts. I left the lower rubber grommets in place for mounting the Rostra module.
The mounting of the Rostra servo module was accomplished by cutting the Rostra supplied mounting bracket to use as a clamp to mount the module to the bracket with the screws supplied by Rostra.
Wiring.
To mount the throttle cable I used the two lock washer nuts (Rostra G18) supplied in the kit to secure the throttle cable to the bracket in the slot the factory throttle cable was mounted in. The nuts are threaded onto the cable outer plastic and will cut the threads on the cable. Then I used the stud clip w/ cable (1.00") (Rostra K1) to snap on the stud tab where the factory throttle cable was removed. The lock washer nuts were adjusted to remove any slack, but be sure the cruise throttle cable is not opening the throttle.
Here is the cringe part. To tie in the Rostra harness to the factory harness it is necessary to cut both harnesses. I cut the factory harness about an inch below the connector. The Rostra wires were cut about 4 inches from the connector. I then used a soldered joint covered with shrink tubing on each wire. I don't recommend using crimp connectors because of not only the size of crimp connectors, but I have found over time crimp connectors will corrode over time in an engine compartment. Here is a schematic showing which factory wire connects to which Rostra wire:

In the above notice the Rostra tachometer wire is connected to ground. Rostra recommends this when the tachometer signal is not used to prevent trash signals from sending a false signal to the module. The abandoned inhibit wire (purple) and the Rostra neutral safety (light green) were just taped in the harness. After I tied in the wiring I reinserted the wires back into the factory split tubing and wrapped the end of the split tubing and the wiring with friction tape. I used friction tape rather than electrical tape because I have found the electrical tape will unwrap due to the heat of the engine compartment melting the adhesive whereas the heat causes friction tape adhesive to bond tighter.
The Rostra throttle cable is a bit longer than the factory cable. Here is how I chose to route it:
Setup and Tuning.
The last step in the installation is the setting of the dip switches under the rubber plug in the cover of the Rostra cruise control module. Under the plug there is also a diagnostic LED which can be used if you run into any issues, but if you have followed the install and wiring instructions given here and set the dip switches, you should not have any problems.
Now here are the dip switch settings I used. Bear in mind these are for the 3.8L engine with the supercharger, so the naturally asperated 3.8L engine may need a slight difference, which I will cover later.
- Gain – off
- Gain – on
- Pulses per mile – on
- Pulses per mile – off
- Pulses per mile – off
- Pulses per mile – off
- Engine/Setup Timer – off
- Engine/Setup Timer – on
- Engine/Setup Timer – off
- VSS Source Square Wave Input – on
- Transmission Automatic – on
- Control Switch Open Circuit – off
The above settings are for (1-2) mid gain, (3-6) 4,000 pulses per mile, (7-9) 6 cylinder/low, (10) square wave input, (11) automatic transmission and (12) open circuit control switch. If you have the naturally aspirated engine you may need to change the gain with switches 1-2 and/or the engine/setup timer switches 7-9 per the Rostra manual. With the settings I listed above my supercharged Park Avenue Ultra acted just like the factory cruise did when it was working.
The Rostra Universal Electronic Cruise Control 250-1223can be bought by clicking the link.